Lawn stripers work by laying the grass down in a specific direction – leading to a different appearance when you look at it from a particular direction. The way the grass lies reflects light or creates shadows, meaning you can create any pattern on your lawn.
Whether you want to create checkers, swirls, or stripes on your lawn, you can make DIY lawn striper kits at home. DIY lawn stripers are as effective as store-bought lawn striper kits but come at a lower cost.
Contents
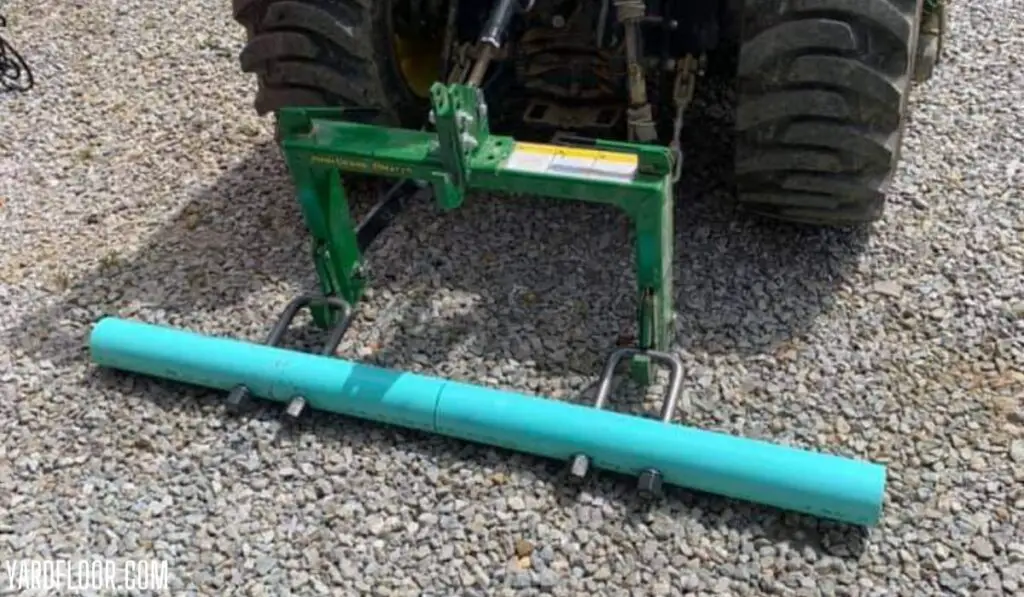
Simple PVC Pipe DIY Lawn Striper
Let’s start with a simple DIY PVC lawn striper. It is the simplest, requiring a few materials – some of which you can find lying around your house.
To make the lawn striper, gather:
- At least a 2” wide PVC pipe
- Two end caps to fit the pipe
- Hooks
- Plastic ties
- A long wire
- Sand or gravel
After assembling these tools, proceed with the following steps.
- Start by cutting the pipe to the same length (or slightly smaller) as your lawn mower back wheels. Measure the distance between the outside of each back wheel for the best results.
- Drill two holes in the end caps. This is where the plastic ties will go. Fasten the plastic tie on the inside of the cap, leaving a part of the tie on the outside.
- Attach an end cup to one side of the PVC pipe, then fill the pipe with sand or gravel.
- Close the other end of the PVC cap
- Attach two hooks on the same side of the PVC pipe. Determine the distance between the hooks based on the distance between the parts on your mower where you will tie the striper.
- Tie the filled PVC pipe to the back of your mower. Keep it about an inch or two above the ground, as this is closer to the desired height of striped grass. Also, keep it as close as possible to the mower to make for easier turns when making corners.
You can make your simple DIY lawn striper more sophisticated using bolts, brackets, nuts, and washers instead of plastic ties and long wires.
Here are the steps to make your DIY homemade lawn striper kit that lasts longer:
- Cut your PVC pipe the same size as the width between the back wheels of your mower.
- Drill holes at the center of your end caps. The holes should be the size of the bolts you will use.
- Insert the bolt through the end cap. Add a bolt nut on the inside and tighten. You may add a washer for extra grip. Alternatively, you can use a threaded rod 3” longer than the PVC pipe.
- Fill sand in the pipe and lock the other side of the pipe.
- Attach the DIY striper kit to your lawn mower. To attach the striper to the lawn mower, you may use simple ties, as we mentioned before, or you can use an L-bracket for a longer-lasting solution.
- Find an L-bracket the same size as the bolt or threaded rod you are using. You may drill the holes yourself too. Start by placing a spacer on the bolt or threaded rod to protect it from wear; add a flat washer followed by the L-bracket, another flat washer, a lock washer, and a nut. Tighten the nut and repeat for the other side.
- Mount the lawn striping kit to your mower
Tip: Use a drill to drill holes on your mower if it does not have existing holes where you can hang your homemade lawn striper.
DIY Lawn Striper From a Broom
The PVC pipe striper is the most popular DIY lawn striping kit, but there are other options you could explore, one being a broom. Attaching a broom head to your lawn mower makes for an easy homemade lawn striper with the additional benefit of sweeping off any clippings your lawn mower leaves behind.
When choosing a broom for your lawn striping needs, find one with the softest bristles to avoid the risk of damaging grass blades as you mow. The broom head should also be the same length as the back wheels of your lawn mower.
To mount the broom head to your, you can use a hitch mount with bolts. Use some washers to reduce the amount of wear. Alternatively, you may use door hinges to attach the broom to your mower.
If you don’t want to attach your broom to the mower, you can pull a push broom (soft-bristled) with light pressure to strip your lawn in the desired pattern. This is a great idea if you have a smaller lawn.
DIY Lawn Striper From a Rubber Mat
Another great homemade lawn striper solution is using a rubber mat, similar to those found on your doorstep. A rubber mat carries the traction to lay the grass in your mowing direction.
To make the rubber DIY lawn striping kit, you will need:
- A rubber mat (the mat should be thick enough to lay the grass without damaging it and flexible enough to allow you to turn the mower without breaking the mat or stopping your lawn mower)
- A flat piece of metal or stainless steel
- Screws or bolts and nuts
Start by attaching the rubber mat to the stainless steel piece to hold it together. Then, attach the metal piece to the mower using bolts.
Final Thoughts
You can choose one of these easy and affordable DIY lawn stripers to get that baseball or football field look on your lawn without spending so much on commercial lawn stripers. Experiment with other tools or materials available around your home, as long as they mimic lawn stripers.
Hello! My name is Chris, and I am the founder of Yard Floor. When I was a toddler, my family had a lush green lawn. I was at the center of caring for and maintaining this lawn and even proceeded to take an associate’s Degree in landscaping. I am here to share my years of experience with you – be it repairing your mower/tractor or caring for your lawn.